Thursday, July 23, 2015

Review: Gro-Egg Digital Room Thermometer

To be honest, I'm not as vigilant as I should be when it comes to checking James' room temperature. So when I was offered to test out one of the Gro Company's products, I decided to try the Gro-Egg Digital Room Thermometer. 

If you haven't heard of a Gro-Egg, it's basically a room thermometer and nightlight in one. The light changes colour depending on whether the room is hot, cold or just right. 

IMG_1324
We all know that a safe sleeping environment for our little ones is a room temperature of between 16-20 degrees, however this is not always possible. Sometimes it may be colder than this and other times it will be warmer, and knowing what the temperature is at a quick glance allows you to figure out what to dress your bub in for the night. If you're a little unsure you can always check the clothing guide that comes with the Gro-Egg.

The first thing I noticed about the Gro-Egg was the size. For some reason, I had pictured it to be a lot bigger than it was.. not that size matters in this case. In fact, I like that it's small enough to fit in the palm of my hand, making it easy to pack when travelling. 

The light is a little more subtle than your stock standard night light, but it gives out a nice glow. We've been using it in James' nursery for the last week and he loves it. It's been great for us too, just being able to pop our heads in and quickly see the temperature of the room. 

Now I'm keen to get one of the super cute Gro-shells for it..

I'm leaning towards the Owl, which do you like best?

1

xx

Sunday, July 12, 2015

I Did It.. I Started My Own Lolly Buffet Business!

FB1

FB2


FB4


It's called Treat Me Sweet and this was my first event. I have to say I'm pretty pleased with how it all turned out. It was for a baby shower at one of my favourite bars in Canberra (the Loft), it was so much fun to organise and the client was really happy - phew!

I decided to start this business as a hobby more than anything else, just a creative outlet I guess (aside from blogging!).. plus I figure it doesn't hurt to make a little extra cash while we're saving for a new house (more on that later)

I can't believe I actually met one of my New Years Resolutions for once haha! How are your resolutions coming along?

xx

Monday, June 1, 2015

Toddler Table Makeover / Hack

IMG_7026

This was James' first birthday present from me and his daddy. We figured he'd need a little table soon for colouring/eating and I wanted to make him something special that he could use for while.

I was inspired by the Ikea Hack of the Latt Table (which in Australia retails for $40).. but seeing as we don't have an Ikea near us I decided to get this Junior Table & Chair Set from Babies r Us (for $45).

1

My first step was to assemble the table, I used a drill to tighten the screws (a lot quicker than doing it manually). I then sanded the chairs so that I could spray paint them (in hindsight I wish I'd gone with regular paint as the spray paint kept bubbling and dripping - so annoying!).

IMG_6619

I sprayed them with White Knights Squirts Spray Paint in Dusk Grey.

IMG_6624

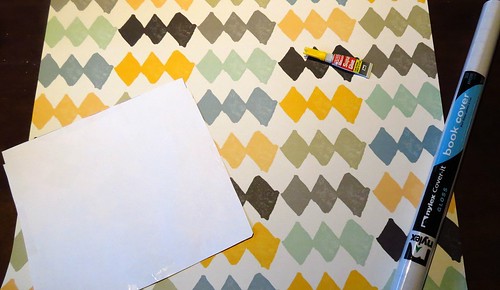
My next step was to cover the print with contact paper. I then traced the inside of the seat on a blank piece of paper to get the right measurements, I then cut this and used it as a template.

IMG_6741

Once I'd cut the print I super-glued it to the chair.

IMG_6756

I then repeated the same process for the table.

 I decided to make a different version for my beautiful niece for her birthday too..

IMG_7047

I won't lie, it was very time consuming (especially the spray painting), but I'm really happy with how they both turned out. I love that they are unique and something the kiddies will be able to use for years to come.

What do you guys think?

IMG_6764

xx

Thursday, May 14, 2015

DIY Cake Smash

1

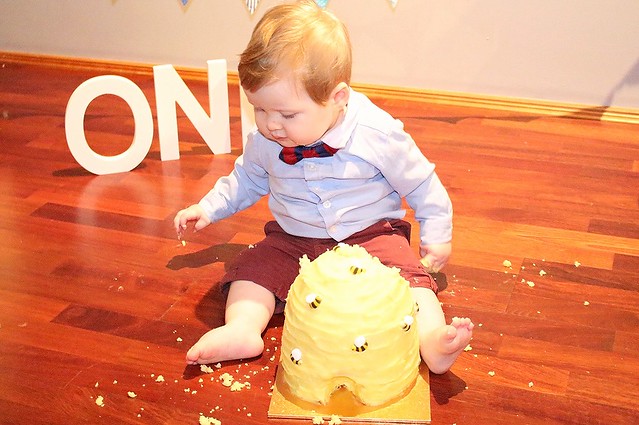
I couldn't resist doing a cake smash for James' first birthday! I think they are so adorable. I considered getting a professional shoot done but thought it would be more fun (and a lot cheaper) to do it myself. I did it the morning after his birthday party so that we could use his cake for the lolly buffet and "happy birthday" candle blow-out. The morning was a great time to do it as he was happy and full of beans (as opposed to tired and cranky which is what he was like at the end of his party).

I was originally planning to do it outside on the grass but it was raining and miserable so I decided to do it in the corner of the living room. Luckily we've got wooden floorboards so I didn't have to worry about hanging a drop sheet. I kept the props pretty simple with left over balloons from the party, a mulicoloured banner and giant letters. Cute, easy and inexpensive. You could also use other props like streamers, pom poms, chairs, chalkboards etc. Just don't go too overboard!

2
3

As I'm not the best baker in the world, I asked my friend to help make this gorgeous butter-cream beehive smash cake for James. I then added a few sugar bees (purchased from eBay) as a finishing touch. Photo-wise, I think it turned out really well. It also tasted amazing! James kept breaking pieces off and trying to give them to me - so I gobbled them up (it would have been rude to say no) and as you can see, James loved it too!

7
8

I kept him in the same outfit as his party to keep it consistent, plus I think it's adorable. I thought about making him a little crown - but knowing him, he'd rip it off straight away. I also think overalls would have been cute. A lot of bubs go topless for these shoots but I prefer it when they wear fun outfits (for girls I think tutu's are a must!).

9
10

This is definitely a two person job! One to take photos and the other to keep them from crawling off. Having two people also makes it easier to clean up! After the shoot, I cleaned James up (jumped in the shower with me) while Rob put the left over cake away and cleaned the floor.

11

I'm so happy with how the photos turned out and I think James had a great time digging into that cake. I definitely recommend doing your own cake smash if you've got the time (and a good camera) as they are so much fun!

xx
Related Posts Plugin for WordPress, Blogger...